ℹ️ 注意: 此页面不再进行维护。要获取更更新的脚本和扩展列表,您可以使用Web UI内置的选项卡(
Extensions->Available)。
安装和使用自定义脚本
要安装自定义脚本,请将它们放入scripts目录中,并在设置选项卡底部点击Reload custom script按钮。安装后,自定义脚本将出现在txt2img和img2img选项卡的左下角下拉菜单中。以下是一些由Web UI用户创建的著名自定义脚本:
txt2img2img
https://github.com/ThereforeGames/txt2img2img
大大提高任何字符/主题的可编辑性,同时保留其相似性。该脚本的主要动机是改进通过Textual Inversion创建的嵌入的可编辑性。
(克隆时要小心,因为其中有一些venv被检查)
示例:(点击展开)

txt2mask
https://github.com/ThereforeGames/txt2mask
允许您使用文本指定修复遮罩,而不是刷子。
示例:(点击展开)

Mask drawing UI
https://github.com/dfaker/stable-diffusion-webui-cv2-external-masking-script
提供了一个由CV2驱动的本地弹出窗口,允许在处理之前添加蒙版。
示例:(点击展开)

Img2img 视频
https://github.com/memes-forever/Stable-diffusion-webui-video
使用img2img,逐个生成图片。
高级种子混合
https://github.com/amotile/stable-diffusion-backend/tree/master/src/process/implementations/automatic1111_scripts
该脚本允许您基于多个加权种子来生成初始噪声。
例如:seed1:2, seed2:1, seed3:1
权重被归一化,因此您可以使用像上面那样的较大权重,或者您可以使用浮点数:
例如:seed1:0.5, seed2:0.25, seed3:0.25
提示混合
https://github.com/amotile/stable-diffusion-backend/tree/master/src/process/implementations/automatic1111_scripts
这个脚本允许你通过在生成图像之前数学地组合它们的文本嵌入来合并多个加权提示。
例如:
包含元素{火|冰}的水晶
它支持嵌套定义,所以你也可以这样做:
包含元素{{火:5|冰}|土}的水晶
Animator
https://github.com/Animator-Anon/Animator
一个基本的img2img脚本,可以导出帧并生成视频文件。适用于创建有趣的缩放变形电影,但目前功能不太多。
Parameter Sequencer
https://github.com/rewbs/sd-parseq
通过对许多稳定扩散参数(如种子、比例、提示权重、去噪强度等)以及输入处理参数(如缩放、平移、3D旋转等)进行紧密控制和灵活插值,生成视频。
替代噪声计划
https://gist.github.com/dfaker/f88aa62e3a14b559fe4e5f6b345db664
使用替代生成器来进行采样器的sigma调度。
允许从crowsonkb/k-diffusion中访问Karras、指数和方差保持调度以及它们的参数。
Vid2Vid
https://github.com/Filarius/stable-diffusion-webui/blob/master/scripts/vid2vid.py
从真实视频中,img2img帧并将它们拼接在一起。不将帧解压到硬盘。
Txt2VectorGraphics
https://github.com/GeorgLegato/Txt2Vectorgraphics
根据您的提示创建自定义的可缩放图标,以SVG或PDF格式。
示例:(点击展开)
| 提示 |PNG |SVG | | :-------- | :-----------------: | :---------------------: | | 快乐的爱因斯坦 | |
|  |
|  |
|  |
| Loopback and Superimpose
https://github.com/DiceOwl/StableDiffusionStuff
https://github.com/DiceOwl/StableDiffusionStuff/blob/main/loopback_superimpose.py
将img2img的输出与原始输入图像以alpha强度混合。结果再次输入img2img(在循环>=2时),并重复此过程。倾向于锐化图像,提高一致性,减少创造力和细节。
插值
https://github.com/DiceOwl/StableDiffusionStuff
https://github.com/DiceOwl/StableDiffusionStuff/blob/main/interpolate.py
一个用于生成中间图像的img2img脚本。允许使用两个输入图像进行插值。更多功能请参阅readme。
运行n次
https://gist.github.com/camenduru/9ec5f8141db9902e375967e93250860f
使用随机种子运行n次。
高级回环
https://github.com/Extraltodeus/advanced-loopback-for-sd-webui
具有参数变化和提示切换等其他功能的动态缩放回环!
prompt-morph
https://github.com/feffy380/prompt-morph
使用稳定扩散生成形态序列。在两个或多个提示之间进行插值,并在每个步骤中创建一张图片。
使用新的AND关键字,可以选择将序列导出为视频。
提示插值
https://github.com/EugeoSynthesisThirtyTwo/prompt-interpolation-script-for-sd-webui
使用此脚本,您可以在两个提示之间进行插值(使用"AND"关键字),生成任意数量的图片。 您还可以生成一个gif动画作为结果。适用于txt2img和img2img。
示例:(点击展开)
非对称平铺
https://github.com/tjm35/asymmetric-tiling-sd-webui/
独立控制水平和垂直无缝平铺。
示例:(点击展开)

强制对称性
https://gist.github.com/missionfloyd/69e5a5264ad09ccaab52355b45e7c08f
在每n步中对图像应用对称性,并将结果发送给img2img。
示例:(点击展开)

txt2palette
https://github.com/1ort/txt2palette
通过文本描述生成调色板。该脚本将生成的图像转换为颜色调色板。
示例:(点击展开)

XYZ绘图脚本
https://github.com/xrpgame/xyz_plot_script
生成一个.html文件以交互式浏览图像集。使用滚轮或箭头键在Z维度上移动。
示例:(点击展开)

扩展的XY网格
https://github.com/0xALIVEBEEF/Expanded-XY-grid
这是一个为AUTOMATIC1111的stable-diffusion-webui定制的脚本,为标准的xy网格添加了更多功能:
-
多功能工具:允许在一个轴上使用多个参数,理论上可以在一个xy网格中调整无限数量的参数
-
可自定义的提示矩阵
-
将文件分组存放在一个目录中
-
S/R占位符 - 用所需的值替换占位符值(参数列表中的第一个值)。
-
在网格图像中添加PNG信息
示例:(点击展开)
 示例图像:提示: "达斯·维达骑自行车,修饰符";X轴:多功能工具:"提示S/R:自行车,摩托车 | CFG比例:7.5,10 | 提示S/R占位符:修饰符,4k,artstation";Y轴:多功能工具:"采样器:欧拉,欧拉a | 步骤:20,50"
## 将嵌入转换为PNG
https://github.com/dfaker/embedding-to-png-script
将现有的嵌入转换为可共享的图像版本。
示例:(点击展开)

示例:(点击展开)

示例:(点击展开)
 基本逻辑与x/y图相同,只是内部,x类型固定为步骤,y类型固定为cfg。
在步骤1|2值(10-30)范围内生成与步骤计数(10)相同数量的x值。
在cfg1|2值(6-15)范围内生成与cfg计数(10)相同数量的x值。
即使将1|2范围限制颠倒,它也会自动更改。
在cfg值的情况下,它被视为int类型,不读取小数值。
## 随机
https://github.com/lilly1987/AI-WEBUI-scripts-Random
在没有网格的情况下重复一定次数。
示例:(点击展开)
 ## 稳定扩散美学评分器
https://github.com/grexzen/SD-Chad
对您的图像进行评分。
## img2tiles
https://github.com/arcanite24/img2tiles
从基础图像生成瓷砖。基于SD放大脚本。
示例:(点击展开)
 ## img2mosiac
https://github.com/1ort/img2mosaic
从图像生成马赛克。该脚本将图像切割成瓷砖,并分别处理每个瓷砖。每个瓷砖的大小是随机选择的。
示例:(点击展开)

示例:(点击展开)
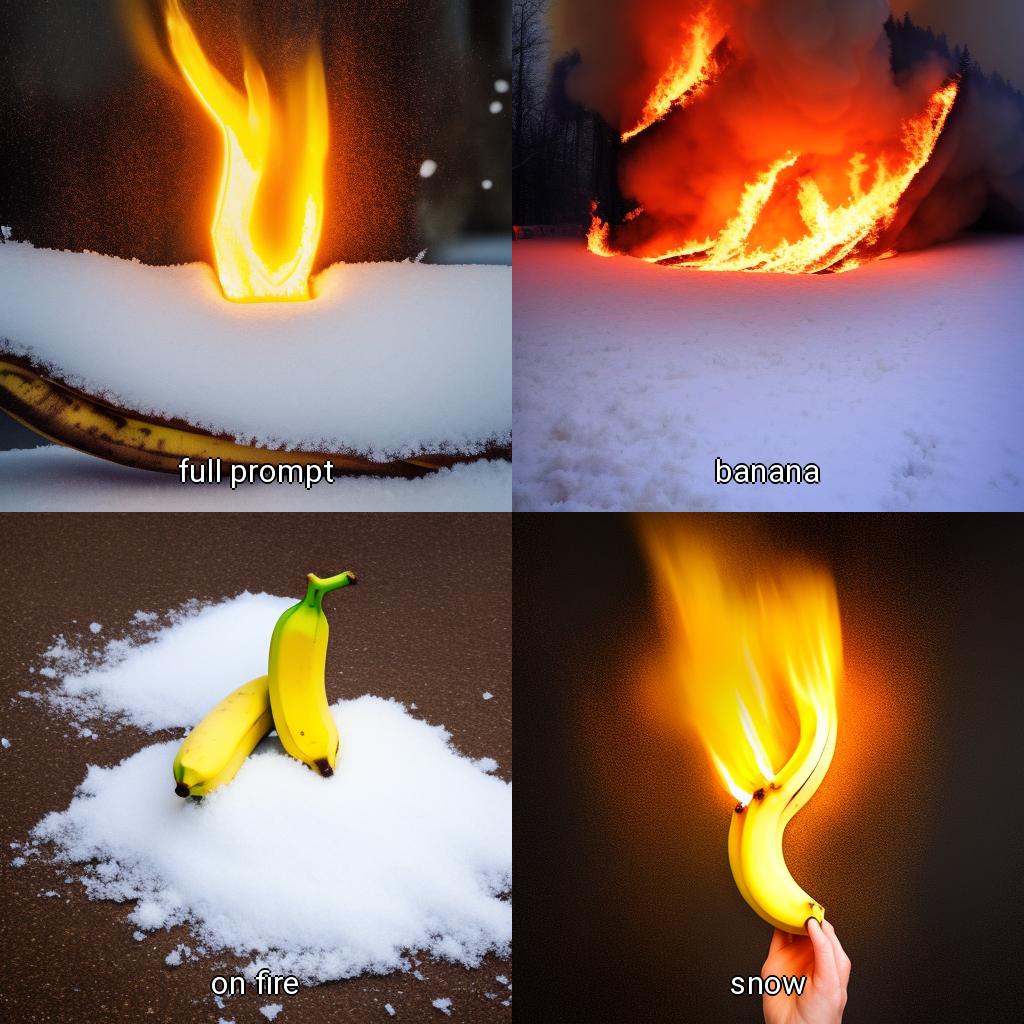
这里的提示只是:“**香蕉,着火,雪**”,所以您可以看到它已经生成了每个图像,而没有每个描述。 您还可以测试负面提示。
示例:(点击展开)
| 禁用 | 启用x8,不调整大小,不使用调色板 | 启用x8,不使用调色板 | 启用x8,16色调色板 | | :---: | :---: | :---: | :---: | | |  |  |  | [使用的模型](https://publicprompts.art/all-in-one-pixel-art-dreambooth-model/)日本庙宇与盛开的樱花树,全身游戏素材,像素精灵风格
步骤:20,采样器:DDIM,CFG缩放:7,种子:4288895889,尺寸:512x512,模型哈希:916ea38c,批次大小:4
1. 对生成的图像进行评分并附加到图像信息中
https://user-images.githubusercontent.com/98524878/233889441-d593675a-dff4-43aa-ad6b-48cc68326fb0.mp42. 自动过滤得分低的图像
https://user-images.githubusercontent.com/98524878/233889490-5c4a062f-bb5e-4179-ba98-b336cda4d290.mp4import os.path
import modules.scripts as scripts
import gradio as gr
from modules import shared, sd_samplers_common
from modules.processing import Processed, process_images
class Script(scripts.Script):
def title(self):
return "将采样过程的步骤保存到文件中"
def ui(self, is_img2img):
path = gr.Textbox(label="将图像保存到路径", placeholder="在此处输入文件夹路径。默认为webui的根文件夹")
return [path]
def run(self, p, path):
if not os.path.exists(path):
os.makedirs(path)
index = [0]
def store_latent(x):
image = shared.state.current_image = sd_samplers_common.sample_to_image(x)
image.save(os.path.join(path, f"sample-{index[0]:05}.png"))
index[0] += 1
fun(x)
```python
        fun = sd_samplers_common.store_latent
        sd_samplers_common.store_latent = store_latent

        try:
            proc = process_images(p)
        finally:
            sd_samplers_common.store_latent = fun

        return Processed(p, proc.images, p.seed, "")
fun = sd_samplers_common.store_latent
sd_samplers_common.store_latent = store_latent
try:
proc = process_images(p)
finally:
sd_samplers_common.store_latent = fun
return Processed(p, proc.images, p.seed, "")